Friday, September 12, 2014

The backplate of the HTPC - the hidden utility factor

As stated earlier, the new power supply ruined my plans and had to think through everything again. After the birth of the new positioning, i measured and drawed the rear panel connectors of the new power supply (just the power supply from now on) and began to cut. As suspected, the backplate could not stand the pressure and got bent. I note that even if the cut has been a success, the plate would totally lost it’s endurance, so gave it all up halfway (see previous post for the image).

Redesign 

I needed a new backplate – no questions. Found in the courtyard a 1 mm thick sheet metal that looked and proved durable enough for the job. I made two drawings on it: one contained bending lines (pictured at the top) and the other did not. The latter prevailed as I had no opportunity to do a smooth bend, and the plate was strong enough to keep the roof while bolted to the frame anyway.

The bottom drawing was the winner. No bending, cuts only


Here it is to be noted, that in the absence of a proper tool (like the Dremel 3000) the cut (I mean sawing, drilling and filing) was a painful and lengthy process. If anyone wants to go the same way without enough patience, just drop it. Seriously! The end result, however, made up for everything. Here are some pictures:


HTPC backplate cutting is done

HTPC backplate is fitted - very nice

The red metal cover goes beautifully with the gray color of the htpc case.
The colored spots on the table are the watercolor left-overs of my boys creative side

The back panel has a total of five bolts. Three are connected only to the frame, while two serve as a power station unit  holder too. Since this latter piece is pretty light, the two screws were enough. Thus, each is rigidly and firmly fixed.

Backplate mission success!


HTPC backplate installed - what a beauty

Monday, September 8, 2014

HTPC Power supply replacement and new complications

I managed to get hands on a MiniATX PSU, which is much smaller and more powerful, and at the first test it powered everything, so there is no more compromise with the multi-card reader. No sata connectors, but all can be solved with a converter. Here are a few comparison pictures about old and new htpc psu:

PSU Comparision
PSU Comparision


When you build your HTPC, make sure your PSU can handle all, and it’s a small form factor

I should mention, that I did look at Pico PSU’s, but they are much more expensive, and largely depend on the external power brick, which is usual less than 100W. E.g. a 160W combo is like double in price than a MiniATX 200W internal PSU!!!

So immediately after i had it home, had the first tests: i connected it to the motherboard, and everything else, than started the machine - and violá it run! This was followed by a steeper and less relevant thermal test: i put the cover on, and the remaining spaces were covered with a small blanket (the cover did not properly fit as the PSU was just inserted in the case for this test). Half an hour later, the temperature of  the CPU and motherboard increased only by a few values, which is a good sign.

So let’s install this puppy


Unfortunately, the new PSU size, shape, connection and placement of ventilation is completely different, so not only does not fit in the old place, the backplate of the box also had to be cut, which was already showing singns of weakness. Luckily there was enough space in the left of the case so every plan turned upside down and there came the complete re-design and optimization of this HTPC build.


This was the point where I decided a complete re-design and optimization

Thanks to an old friend, i received an empty tower box, and immediately removed the hard drive tray from it.

Empty PC tower

All i needed was the HDD tray - half of it actually


After some rough measurements, came up with a new plan: the motherboard remain where it is, the power supply and hard drives will be on the left side, and on the right side of the mouse and the CIR / infrared plate. And on the top of them the DVD rom. Both hard drives will finally get a normal bracket and screws to firmly hold them in place, even if the HTPC DVD Player will not be moved or shaked too much.

The HTPC PSU repositioning plan

Saturday, September 6, 2014

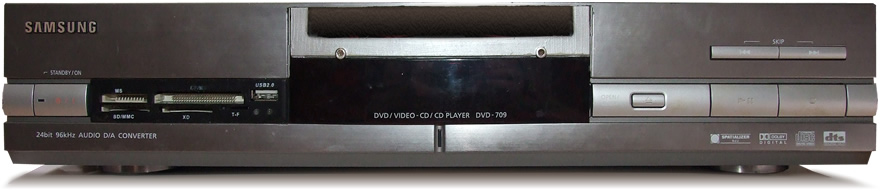
Samsung 709 HTPC build reloaded - 2.0


Before we dive into rebuilding and optimizing  this HTPC build, let's take a look at our current setup. I emphasize, that this is a fully functional system, which unfortunately has a lot of shortcomings and cannot be used as intended.


In the picture you can see listed and highlighted the most important parts, and the immediately observable chaotic arrangement. It was not always this way, but as all is part of a process, had to squeeze in the last parts. It is important to highlight, that the first motherboard was much larger in size and therefore the lifting of the HDD was necessary, and later, after motherboard replacement, I had no reasons to lower it, because the SSD went under, and “the Piéce de résistance” stood firmly too.

Anyway, if it's a working system, then where's the problem? Why should I optimize

First of all there is always room for improvement. Always! Every modder and custom home HTPC builder should be prepared for this.

Secondly, the PSU is slowly failing, and is willing to start only if I remove the card reader or the bluetooth dongle. As the latter is used to connect my PS3 controller, the card reader had to go for now, anyway being just an extra convenience feature

Thirdly, and most importantly, a lot of heat is generated which has nowhere to escape. Things  improved a lot after I drilled some holes into the roof, but after half an hour running, things get scary and it is feared that some parts will permanently fail. And yeah, operates correctly without a roof, but that’s not the goal. 

Redesign
 
It is therefore necessary to replace the power supply, the parts should be reorganized a bit, and I could use a larger fan, although the machine is already louder than it should be, to do something with the air flow and the hard drive to benefit also from some wind

Let's do it!

Thursday, August 28, 2014

HTPC build 1.0 - last entry and stage


Hey folks

Another longer pause without being in touch, but i made progress, nonetheless the HTPC is alive and kicking, but due to lack of time, did not had time to write the action log. 

Moreover, as usual, more and more problems arose, which currently prevent the completion of the project, but since the lineup is strong and even looks as definitive regarding parts and accessories, i decided to close this builder - exchanger - jigsaw period under "HTPC build 1.0" group name, and gather the following under a new generic – HTPC build 2.0 - describing the how to's, solutions, components, etc. 
But before we get to that, the last entry should be supplemented and improved, because it does not reflect the current state. Here it is:
 
First of all I dropped the CF - SATA converter idea, as the 4 gig card would not hold a Windows 7 install. If you read my blog you know, that XP was originally in sight, but for several reasons i decided to call a 64-bit 7 the winner. Despite the fact , that it does have a light version, which is less than 4GB !!!!! after install (search on Google and torrents), together with the mandatory programs and drivers would have exceeded this limit, not to mention the fact that Win 7 has no "embedded" version, resulting in an early death of the CF card. So what about now? Simple: a used 64 GB, SATA 3, OCZ Vertex 3 SSD off eBay. This will hold anything and the quick start would cause no problems. OS checked.

Secondly, the CIR has returned. I do not remember where I was navigating when I came across a german development that can wake the machine from the S5 state - meaning Shut Down just by an infrared signal. It was important to emphasize that is german, because there was no english version of the website, and did not came up in the search results when I was seeking for such a solution. Not to mention, that the owner did not even used any words and phrases related to the modder HTPC world. Lucky me that came across, and I will write about it later. Here is the link:
http://www.atric.de/IR-Einschalter/index.php
Seek for: Produkte - IR-Einschalter Rev.5 (it has english manual)


Edit: i was searching on Youtube for my mobo reviews and tuning, when i saw a video where a guy installed this IR receiver. here's the video:
https://www.youtube.com/watch?v=_hOzx7zmRfk


It is important to mention, that i got a bit of a price reduction, which provided the above advertisement place :)
That is, and will be in touch with the parts breakdown and descriptions.

Tuesday, October 22, 2013

Compact Flash to SATA - a small change and update

As my new mobo does not have IDE connection, i cannot use my old CF to IDE adapter. Of course, SATA is much faster, so the change is welcomed. So went to eBay (again) and purchased a CF to SATA adapter. This is how it looks like:


It was a real bargain for 2 pounds, but the price varies. Check for yourself: eBay CF to SATA adapter

PS: dropped the CIR receiver as i found another COM port based solution. Stay close for details!

Tuesday, October 1, 2013

HTPC build - back to life with E350M1 motherboard

Hey folks

After many reading, thinking, forum posts for advices and eBay sneaks, i finally got my hands on a new motherboard: ASRock E350M1:
E350M1 Specs


Why did i choose this one? Well to be honest it was an awesome built-in feature that made my decision: a CIR header.  Here's a note about it:

"It has been said before, but bears repeating because of how useful the included Consumer Infrared (CIR) header is, putting it on the short list of favorite motherboard features alongside user configurable power LED behavior when in standby. Because the feature is not enabled by default in BIOS, it will need to be enabled after installing a CIR. Then after the Nuvoton (Winbond) drivers are installed it acts as a fully functional Microsoft eHome RC6 IR receiver. This not only frees up a USB port and allows for a cleaner install because the receiver can be mounted inside the chassis, but also includes a feature not supported by the standard USB receivers - wake from off (S5) and hibernate (S4) in addition to standby (S3)."

The best feature is bolded :D

The parts that will make the HTPC ver 3.0 project are:

1) Samsung DVD-709 case
2) a small 450W PSU with both SATA and PATA power connectors and ATX pin headers
3) ASRock E350M1 motherboard
  1. AMD Dual-Core 1.6ghz Processor E350/E350
  2. Supports DDR3 1066, 2 DIMM slots, Max. capacity up to 16GB
  3. Integrated AMD Radeon HD 6310 graphics, DX11 class iGPU, Pixel Shader 5.0
  4. 1 x PCI Express 2.0 x16 slot (@ x4)
  5. Multi VGA Output options: D-Sub, DVI-D and HDMI
  6. 4 x SATA3 connectors
  7. 7.1 CH HD Audio with Content Protection (Realtek ALC892 Audio Codec), Premium Blu-ray audio support
4) 4GB DDR3 1333mhz memory
5) TTSCorp TSL633 laptop DVD RW drive with slimline sata to normal sata adaptor cable
6) Sure Electronics 2x16 chars LCD panel
7) multi format card reader with USB 2.0 support
8) 500GB Samsung HDD
9) 4GB Compact flash card with SATA adaptor to serve as main HDD (SSD like speed for fast boot)
10) an old 5 button mouse circuit board (each button directly wired to the DVD player case buttons for prev, play,/pause, stop, next, eject functions)
11) XBMC based OpenElec as OS
12) CIR IR with remote
13) Bluetooth dongle, smal size USB WIFI adaptor

And almost all in, exept number 12 (highlighted in red above), the CIR receiver. Unfortunately my mobo did not came bundled with one, and to buy it separately would cost me way too much (25$ + 18$ postage from USA), so i wanna make one as a DIY part. Unfortunately no diagram and lack of info on internet, so this must wait a bit.

Next step is to install the OS, configure it, enable EWF and clone it to the CF card.

Stay close!

Wednesday, January 2, 2013

Shortage of time and mobo

Hi again

This project is on hold per moment - as you can see, last post was few months ago - as i am in a shortage of a mobo and cpu. I need an embedded system with passive CPU cooling, since the case is very thin, and heat is a huge problem.

Old mobo and cpu is sold, and until i can get hands on a new one, this project is on hold.

Any idea for a nice cheap - free - mobo and cpu combo is welcomed.

*free: yes, i accept gifts just to finish this project :)