Showing posts with label dvd player like htpc case. Show all posts

Wednesday, September 17, 2014

The optical drive - required for the home theater PC to be a standalone player if needed

Another accessory which caused a lot of headaches and it was probably the hardest part of the redesign.

The box, viewed from the front, initially had the display on top and the tray below. This positioning was not possible with the case modded to a HTPC, because the motherboard would not let me slide the drive into place so that the two vertically had to exchange places. I solved this pretty nicely, but will write about it in a separate blog entry.

In addition, also due to the usual lack of space, a normal dvd drive was out of the question, so a small form factor laptop DVD - CD drive was the answer, who’s connection of course was totally different from the desktop format. Fortunately, eBay is full of cheap adapters and cables, costing only a few bucks. It looks like this:

mSata to Sata adaptor cable


However, the fitting caused more problems than the cables

Thus, I needed something the player to lie on above the motherboard. At the beginning, during build 1.0, this problem, together with the HDD suspension, was solved by a powerful component called “The Piéce de résistance”, but this did not fit in the new structure so I had to invent something again.

After much trials and error puzzling, i realized that the old backplate was sufficiently rigid to hold a tray and to serve as a crossrod too. So I found myself sawing and filing again, another drill and the small L-shaped rod stood firmly in the box. It is also to be noted, that it serves as a  brace too, making it perfect by giving another strength point to the backplate.

The final problem was with the left-back side of the drive and with the fitting. Since this is a laptop unit, the door does not open completely, as it jumps out on eject and needs to be pulled by hand from there, action which can result in pulling the entire drive out of the case if not properly fitted. Then I remembered “The Piéce de résistance”. After cutting it in half, i fitted it to the L-shaped rod obtained earlier, curled up the back and after a few measurements I drilled a small hole in it to hold the drive. The small screw to hold, I had to scour the area around the hole to be much thinner, but this already belongs to fine details :) Here’s an image with the new tool and the DVD drive installed in the case:

Lé Piéce de résistance 2.0

DVD / CD optical drive mounted and fitted into HTPC case

The wondertool and the optical drive highlighted inside the home theater pc case

Monday, September 15, 2014

The heart of the HTPC - installing the hard drives

As I wrote in an earlier post, this time I wanted to store the hard drives in a tray designed for this purpose, and salvaged from an old PC case. Since the entire tray was kinda big – was designed to hold four drives after all -  I had to cut the thing in half. The picture below shows the cut:

PC HDD tray cut in half for HTPC


The cut in half hard drive tray. Now is small enough to fit in a low HTPC case

One half was higher than the other, for obvious reasons I use the lower one. I secured it to the case with three screws: one small hole is visible in the image above, and i drilled a further two. I could not take a normal picture to show them, so here’s a simple diagram to illustrate this:

Low height HTPC case HDD tray mounting diagram


The yellow circles indicate the case screws, the whites hold the hard drives

The installation was smooth. Fixing the hard drives to place was way more problematic, but it is due to lack of space, nothing else. A man with smaller, more feminine hands  would have no issues at all for sure.

Here are the final results:

HTPC HDD tray in place

HTPC HDD tray secured and hard drives mounted - SSD not visible


Saturday, September 6, 2014

Samsung 709 HTPC build reloaded - 2.0


Before we dive into rebuilding and optimizing  this HTPC build, let's take a look at our current setup. I emphasize, that this is a fully functional system, which unfortunately has a lot of shortcomings and cannot be used as intended.


In the picture you can see listed and highlighted the most important parts, and the immediately observable chaotic arrangement. It was not always this way, but as all is part of a process, had to squeeze in the last parts. It is important to highlight, that the first motherboard was much larger in size and therefore the lifting of the HDD was necessary, and later, after motherboard replacement, I had no reasons to lower it, because the SSD went under, and “the Piéce de résistance” stood firmly too.

Anyway, if it's a working system, then where's the problem? Why should I optimize

First of all there is always room for improvement. Always! Every modder and custom home HTPC builder should be prepared for this.

Secondly, the PSU is slowly failing, and is willing to start only if I remove the card reader or the bluetooth dongle. As the latter is used to connect my PS3 controller, the card reader had to go for now, anyway being just an extra convenience feature

Thirdly, and most importantly, a lot of heat is generated which has nowhere to escape. Things  improved a lot after I drilled some holes into the roof, but after half an hour running, things get scary and it is feared that some parts will permanently fail. And yeah, operates correctly without a roof, but that’s not the goal. 

Redesign
 
It is therefore necessary to replace the power supply, the parts should be reorganized a bit, and I could use a larger fan, although the machine is already louder than it should be, to do something with the air flow and the hard drive to benefit also from some wind

Let's do it!

Tuesday, February 21, 2012

HTPC Build – Stage 4 – Pre assembly

I did a test assembly of the HTPC, and here is the result (i will leave the pictures to do the talk here).

No power-on yet, but all looks ok for a start.

HTPC pre-assembled

Tuesday, February 14, 2012

HTPC Build – Stage 1 – Parts and case

Back!

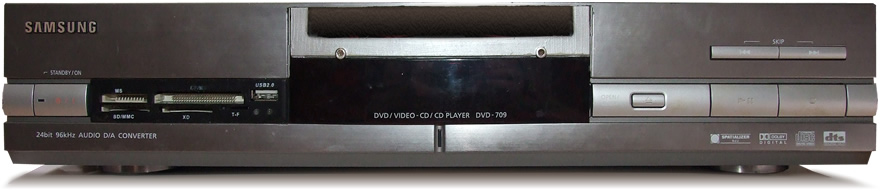
The HTPC case – don’t think that Samsung ever taught about this :) 

Recently i got a Samsung DVD player from a friend – perfect condition BTW, but as a first generation player, it did play only DVD’s – so not much of a use. It was the perfect box for my HTPC, so i ripped it all apart, and i was ready to go. Here is the case:

Samsung DVD 709 - As new
The HTPC case - ready for action


The HTPC parts – or some atleast


I have since a while a MiniATX P3 motherboard with a 1ghz CPU (yes one), 512 SDRAM, what just sits and gathers dust. I have a few HDD’s, and a spare Laptop DVD drive. What do i need? A PSU, some cables, the project, software and a lot of thinking and wireing :) Here’s a picture:

HTPC parts


BTW, do not worry, it will have a dualcore at the end. Read all :)

Explanations of the pictures and HTPC parts from above


1) probably you wonder, why the mouse is there in the above image? Well the DVD player had 5 action buttons on the front panel (you can see in the 1st image) and i wanted to keep them somehow. Initially i wanted to buy a cheap gaming pad, but i remembered i had a mouse with 5 buttons with a cracked case (that is why top is removed). So my plan is to direct-link the DVD front button electronic board to the mouse buttons, and reconfigure thoose with some mouse editor software later.

2) I want to position the mainboard in the middle, PSU in the right, HDD and mouse on elft, DVD in the middle. Here i encountered another problem with the case: you see the 2 bumps in the sides on the second image? Those lift the bottom with 1cm, and the cooler of the PSU does not have enough space for proper airflow – so i need to cut thoose out and replace the created whole with something.

3) If you check the front panel of the case, you can see, that the DVD tray is in the bottom. Well, my laptop dvd player cannot be there, becase the battery and the memory on the mainboard does not allow it to go in :( Here my plan is to take out the black plexiglass (above the hole), move it down a bit, cut the case again, and in the created whole to insert the optical drive. Simple no? :D

4) The power button on the right had only 2 wires, so i cut it, and linked it directly with the power wire what leads to the mainboard. Plus connected the powerled the same way. That should not make any problems.

5) Bottom-right: VGA to s-video cable (2 bucks)

6) Bottom-middle (between the DVD and the cable): laptop drive to PATA cable converter, with floppy drive type power connector. Smart huh? 2 bucks :)

7) For software i have several options:
a) LinuxMCE as standalone OS
B) WinMCE + MOOVIDA (http://www.moovida.com/)
c) WinMCE + Mediaportal
d) several others, not deceided yet, and probably i will try out a few

That’s it for now. Let’s start the building process!