Back!
The HTPC case – don’t think that Samsung ever taught about this 
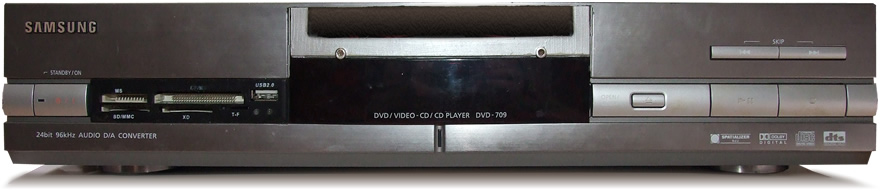
Recently i got a Samsung DVD player from a friend – perfect condition
BTW, but as a first generation player, it did play only DVD’s – so not
much of a use. It was the perfect box for my HTPC, so i ripped it all
apart, and i was ready to go. Here is the case:
 |
| Samsung DVD 709 - As new |
 |
| The HTPC case - ready for action |
The HTPC parts – or some atleast
I have since a while a MiniATX P3 motherboard with a 1ghz CPU (yes
one), 512 SDRAM, what just sits and gathers dust. I have a few HDD’s,
and a spare Laptop DVD drive. What do i need? A PSU, some cables, the
project, software and a lot of thinking and wireing
Here’s a picture:
 |
| HTPC parts |
BTW, do not worry, it will have a dualcore at the end. Read all :)
Explanations of the pictures and HTPC parts from above
1) probably you wonder, why the mouse is there in the above image?
Well the DVD player had 5 action buttons on the front panel (you can see
in the 1st image) and i wanted to keep them somehow. Initially i wanted
to buy a cheap gaming pad, but i remembered i had a mouse with 5
buttons with a cracked case (that is why top is removed). So my plan is
to direct-link the DVD front button electronic board to the mouse
buttons, and reconfigure thoose with some mouse editor software later.
2) I want to position the mainboard in the middle, PSU in the right,
HDD and mouse on elft, DVD in the middle. Here i encountered another
problem with the case: you see the 2 bumps in the sides on the second
image? Those lift the bottom with 1cm, and the cooler of the PSU does
not have enough space for proper airflow – so i need to cut thoose out
and replace the created whole with something.
3) If you check the front panel of the case, you can see, that the
DVD tray is in the bottom. Well, my laptop dvd player cannot be there,
becase the battery and the memory on the mainboard does not allow it to
go in

Here my plan is to take out the black plexiglass (above the hole),
move it down a bit, cut the case again, and in the created whole to
insert the optical drive. Simple no?

4) The power button on the right had only 2 wires, so i cut it, and
linked it directly with the power wire what leads to the mainboard. Plus
connected the powerled the same way. That should not make any problems.
5) Bottom-right: VGA to s-video cable (2 bucks)
6) Bottom-middle (between the DVD and the cable): laptop drive to
PATA cable converter, with floppy drive type power connector. Smart huh?
2 bucks
7) For software i have several options:
a) LinuxMCE as standalone OS
B) WinMCE + MOOVIDA (http://www.moovida.com/)
c) WinMCE + Mediaportal
d) several others, not deceided yet, and probably i will try out a few
That’s it for now. Let’s start the building process!